Preparing potatoes for planting - how to properly carry it out? Planting potatoes requires preparation. It includes several steps. First selection of seed tubers. How important is landscaping? Do you need to sprout potatoes? Can I do without him? Practice shows that this is a very important stage - sprouting potatoes. How to do it without errors? Read about it below.
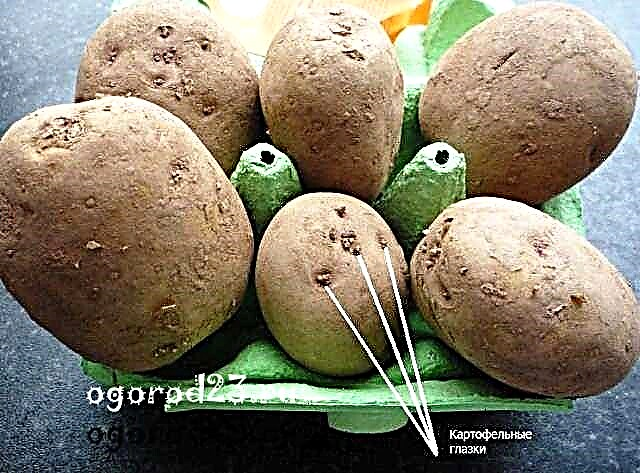
Seed is a potato that is used for growing crops, but not any, but one that has been prepared for planting. When the potatoes are at rest they are smooth, but upon careful examination you can see the “eyes” where the sprouts will sprout from. Currently, seed material is almost always made from mini-tubers that are grown in the laboratory to protect it from viruses and pests.
Certified specialists receive tubers within 3-5 years. Conditions are very strictly controlled. Then they go to specialty stores.
Selection of potato tubers for seeds
My parents started preparing for planting on the field, picking tubers for seeds from the previous year's crop. But now this method of obtaining seed material is not suitable. Seeds are best purchased in specialized stores, i.e. seed potatoes must be certified. This means that the tubers are not infected with any disease or pest.
First of all, you should decide which potato you want to grow or, rather, eat. Now there are a great many varieties. Some are great fried, some are preferable for soups, and some are especially delicious when baked or mashed. Or do you like do-it-yourself chips? And there are such varieties!
Regardless of where you purchased the seed, you should carefully check its quality before starting preparation. No doubt it should not contain rotten or damaged tubers. The surface of the potatoes should be clean, without spots, without soft patches. Cracks or warty growths should also not be, as this can be signs of many diseases.
In the picture above, the crack on the tuber suggests that if you plant it, it will rot - you will not get a healthy crop from it. This is one of the most common diseases - dry rot.
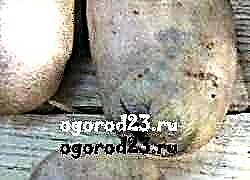
And in the photo below, the seed potatoes are well planted, but, as you can see, the tubers are very shriveled. This indicates that they were stored at low humidity and at temperatures above 10 degrees. Such weakened seed will also not give you a good harvest.

Let me remind you that the most comfortable storage temperature of seed potatoes before germination is not higher than 4 degrees.
The size of seed tubers should not exceed the size of a chicken egg. But there are some varieties, for example, the Impala variety, which even has large seed material. If so, then they can be divided into several pieces so that each lobe has one or two eyes. This technology of growing potatoes from eyes is very common among gardeners.
Sprouting potato
What potatoes to plant, sprouted or not? It is up to you. There are several options.
You can plant it without first sprouting, without special preparation of potatoes for planting in the spring. Such tubers can be planted without waiting until the earth warms up to 10 ° C. But then experienced gardeners are advised to cover the site with non-woven covering material, for example, Agrospan 30. It is especially effective in growing early young potatoes. In the Kuban, an early harvest of young potatoes grown under shelter can be obtained in the month of May. The covering material protects the plantings from sudden changes in temperature. The ground warmed up under shelter keeps the temperature better, it does not even drop to zero, so potato seedlings will not be affected by frost.
For reference. Potato tubers begin to sprout actively at soil temperatures from + 7 ° C. As practice shows, at a temperature of + 11 ° C, seedlings appear on about the 23rd day, at + 14 ° C - on the 17th day, at + 18 ° C - on the 12th day. After emergence, the sprouts continue to develop at a temperature not lower than + 7 ° C, and the active formation of leaves occurs only at a temperature not lower than + 11 ° C. The optimum temperature for the growth of stems, leaves and flowering: from + 16 ° C to + 20 ° C. An intensive growth of tubers is observed when the soil is warmed up from + 16 ° С to + 19 ° С. Shoots can withstand short-term freezing up to -1.5 ° C. But if the soil freezes at least to -1 ° C, then the tubers will freeze, rot and die.
Of course, seed potatoes can be planted without germination. But there is no guarantee that non-sprouted tubers will sprout. Or they will sprout, but the shoots may be too thin and weak - a good harvest can not be expected. That is, from the germinated seed material, you could choose tubers with good, strong sprouts, rejecting tubers with flaws. And, without sprouting potatoes, not preparing it for planting, planting it, already in the field among shoots you will see empty places or bushes with weak shoots.
So, it is advisable to germinate the seed tubers before planting. Pre-germination can reduce the time to harvest from 10 to 14 days. Different varieties germinate at different speeds. But it will take about 4-6 weeks.
When to start sprouting potatoes? In the Kuban, they begin to plant it in the last decade of March (March 21-31). So for germination from the cellar you need to get and lay out tubers in a warm room for 1-1.5 months (February 15-25).
Put the potatoes in a single layer in a warm place, protected from the open sun. After a while, the eyes will “wake up”, sprouts will appear. When the sprouts reach a length of 2-3 cm, the seeds are ready for planting. Sprouts should be thick, stocky. If among the sprouted ones there are tubers with thin, filiform sprouts, then they should be rejected, since a good crop cannot be obtained from such seed material. But it also happens that on one tuber there are both thick and thin shoots. If you have enough seed, I would advise you to reject such tubers. But, if you have few potatoes for planting, I advise, shortly before planting, to remove all weak shoots, except for 2-3 thick and healthy shoots. Large tubers can be cut into 2-3 parts so that each piece has 1-2 sprouts.
As I said, the process of germination is not necessary, but it will give you a number of advantages. One of the benefits is getting an earlier crop. This will allow plantings to avoid the summer heat (this is relevant for the southern regions), help save your crop from diseases, pests: Colorado potato beetle is not so dangerous to stronger potato bushes. Germination also contributes to the earlier formation of tubers and increases yield.
Look at the photo above. The tubers of this seed potato have very long shoots. The sprouts are quite thick, the tuber has a healthy appearance, but such sprouts are very fragile, they can easily come off and may not withstand transportation to the planting site. And if they survive, then they will break off when you cover the tuber with earth from above.
Short thick sprouts are quite stiff, they will withstand transportation and pre-planting.
If you notice that the tips of the sprouts are blackened, then this is a signal that the room in which you grow seed tubers is too cold.
Preparing seed potatoes for planting may require cutting tubers.
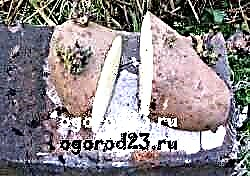
Cut the tuber into several parts, as in the photo above. When cutting, make sure all parts have good healthy sprouts. It is necessary that the eyes were on each part of the tuber. These are growth points where new stems will appear. Pieces should not be too big. Oddly enough, the eyes on smaller pieces begin to germinate faster, stronger roots develop on them, i.e. they do not live off seed stocks. Do not try to leave many eyes in one piece. Several stems will sprout from each eye. If together, like a bunch, many stems grow, then they will fight with each other for a place in the sun, for nutrients. Let the chopped pieces dry for a day. You can pre-dip each piece into ash. This will dry the slice, help it resist disease.
If you missed the optimal time for germinating seed potatoes and no more than a month is left before planting, then place it where the temperature will not be lower than 25 ° C. Such a temperature regime will accelerate the process of germination and sprouts will appear in 20-25 days.
Germination of seed potatoes in sawdust
Tubers will sprout much faster if, after "pecking" the eyes, pour moist sawdust from the bottom and top of them with a layer of 3-4 centimeters. Sawdust periodically (as needed) should be moistened. When they are moistened (if necessary) and at a room temperature not higher than + 12-14 ° C, after two weeks, a well-developed root system will appear in the tubers.
Using another method of germination in sawdust, preparing potatoes for planting will take 5-6 days. This method is somewhat more complicated than the previous one. Prepare a solution: pour 10 grams of superphosphate into 10 liters of boiling water, mix and let it brew for two days. Pour the resulting solution into another container and add 30 grams of potassium chloride, 2 grams of copper sulfate, 2 grams of boric acid and 0.5 grams of potassium permanganate (potassium permanganate). Stir the resulting solution, moisten it with sawdust. Place the tubers upside down on these sawdust. Everything, in a few days a good planting material is ready.
Planting potato tubers before planting
Greening should begin 2-2.5 weeks before planting. It is produced simply. Tubers stacked in rows in a drawer are exposed outside, in the sun, and covered with a film that retains heat and moisture from above. The sprouts that appear will be only 3-5 mm long, but when planted, they do not break off. The gardening method accelerates bush growth, increases tuberization, productivity (by 14-15%).
Germination of potatoes is a procedure highly recommended by gardeners to increase yield. It is better to hold it belatedly than not to do it at all.